
Accessing WMS data in MapInfo Pro
Retrieving Map Data from Web Map Services
Once a WMS server has been added to MapInfo Pro, users can retrieve map data from it.
Keep in mind that Web Map Service is a new technology and the maps one is looking for may not exist for the desired geography.
Further, the data that is provided is determined by the server. When one makes WMS data part of a workspace, the .TAB file causes MapInfo Pro to contact the server each time to get the current layer from the web site.
If that data is removed or the site is down, the data one has saved cannot display.
Note: The available data is determined by the WMS Server. MapInfo Pro does not have control over the data itself.
The WMS Servers that display in the WMS Server list are based on a list we have compiled for users.
We have no control over the availability of these servers at any given time.
The availability of WMS data depends upon the status of the server and the status of the maps on those servers.
Users can customize this list to suit their needs.
Note: Users must have an Internet connection whenever retrieving WMS data.
To access WMS data and build a .tab file:
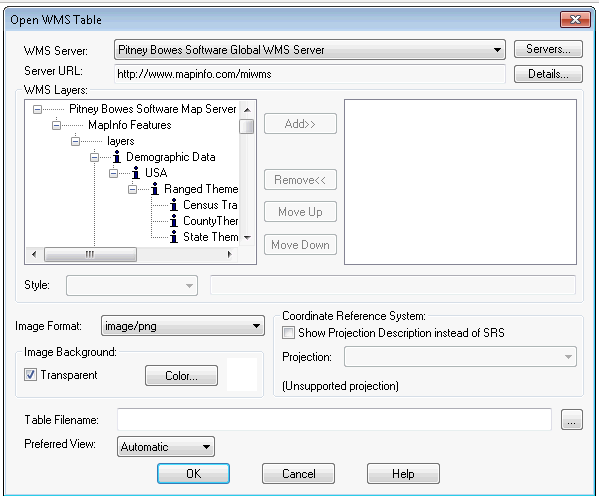
1гҖҒIn 32-bit Pro, choose File > Open Web Service > Open WMS or click to display the Open WMS Table dialog box.
(In 64-bit Pro, go to Home > Open > Web Services)
1. The order of the layers selected determines their display order.
2. Click the Move Up and the Move Down buttons to arrange the layers appropriately.
Note: The WMS servers that display in the WMS Server list are based on a list compiled for users.
We have no control over the availability of these servers at any given time. The availability of WMS data depends upon the status of the server and the status of the maps on those servers. Users can customize this list to suit their needs.
3. To work with the layers from a particular server, select a WMS server from the drop-down list.
To see the details of a particular WMS Server, including the Server URL, the Server Name, version, and usually a server supplied description, click Details.
If the desired server in the WMS Server drop-down list is not found, click the Servers button to display the WMS Servers List.
4. When users have completed their work in the WMS Servers List, they should click OK to return to the Open WMS Table dialog box.
5. Review the list of available layers for the server selected and do one of the following:
В· Users double-click on one or more layer(s) they want to retrieve in the WMS Layers list to move them to the right pane
В· Click each layer that users want to retrieve from the server and click Add to move them to the right pane
Note: The topmost layers display over the bottom most layers.
6. Users decide how they want to use these WMS server layers and can do one of the following:
В· To create a single .tab file with several WMS layers in it, select all of the layers for that .tab file so they display in the right pane.
Then organize them in the desired order using the Move Up and Move Down buttons.
В· To create individual .tab files for the WMS server layers wanted, select one layer at a time, select the appropriate Style, Format, and Projection options from their drop-down lists and save the .tab file. Repeat this process for each layer wanted to retrieve.
Using either method, move the layer(s) selected to the right pane.
The Style, Projection, and Image Format information associated this layer or layers change to reflect either the attributes of the single layer or the attributes that all the layers have in common.
The process for changing and selecting these attributes is described below.
Note: To remove a layer from the list in the right pane, select the layer to remove and click the Remove button.
1. If there are styles associated with the layer(s) selected, they display in the Style drop-down list. Styles indicate the visual display options available with this layer and are supplied by the web server. Initially, the selected layer is displayed in the server's default style. The style that displays pertains to the currently selected layer.
To change the style of a layer, click it in the left or right pane and select the style from the Style drop-down list. The styles selected for a layer do not pertain to any other layer in the list.
Note: Users can also change these image display style attributes later. On the Map menu, point to Layer Control and double-click the layer to override options in the Layer Properties dialog box. In this dialog box users can change the image's translucency and transparency as well as other raster display properties available in MapInfo Pro.
2. Choose a format for the layer from the Image Format drop-down list. The options that display in this list may differ depending upon the formats the server supports and the formats supported. MapInfo Pro currently support: PNG, JPEG (JPG), TIFF (GeoTIFF and TIFF) and GIF formats, in that order of priority.
3. To change the background options, specify them in the Image Background box. To make the background of the layer transparent, click the Transparent check box and select the color of the background. Click the Color button to display the list of colors.
Note: The more color depth the image has, the more difficulty users have isolating the background for transparency purposes. If users experience problems with transparency with one image format, try another, if available.
4. The Coordinate Reference System Projections drop-down list displays all of the projections that the selected layers have in common. This list is disabled when the selected layers do not have any projections in common. If the Projections drop-down list is disabled, one cannot make a map request. The SRS Code is still indicated when users select the Show Projection Description instead of SRS check box.
Note: Selecting the Show Projection Description instead of SRS check box may slow down performance.
Select the Show Projection Description instead of SRS check box to display the projection name. If this check box is cleared, the SRS codes display instead.
Note: To enable this list, try removing layers one at a time to see if the problem is caused by layers not having projections in common.
5. To enter a name for this table, do one of the following:
В·Click the button at the end of the Table Filename field to display the Please specify a TAB filename dialog box. Select the path and type the file name in the Filename field and click OK.
В·Type the path into the Table Filename field
Note: There are three conditions that might prevent the saving of the .tab file at this point.
To save the .tab file users must:
В·Select at least one valid layer from the WMS Server list
В·Layer(s) must contain a supported projection
В·Type a valid .tab file name
6. Select the view for this map in the Preferred View drop-down list to determine where the WMS table should display after it is opened. Options include: Automatic, Current Mapper, New Mapper, and No View.
7. Click OK to generate the WMS map request.
Once users have saved a WMS table name, they can change its WMS layer settings using the WMS Table Properties dialog box.
To access this dialog box, go to the Table menu and click WMS Table Properties.
When this dialog box displays, select the layer wanted for settings editing for that layer.
Users can also add, remove, and reorder the WMS layers, change the projection, image formats, and background options of the layers.
Remember, the display attributes for the WMS table can be edited by clicking the Style Override swatch for the layer in Layer Control.
Setting the Projection for WMS Layers
To set the projection for a WMS layer:
1. In the Open WMS Table dialog box, highlight a layer in the left or right pane and choose a projection from the Coordinate Reference System drop-down list.
2. If users set the projection for a layer in the left pane and then move it to the right pane that already contains layers, all the layers in the pane will be set to the new projection. Any changes to the projection for one layer affects all the layers.
3. If there are multiple layers in the right pane, the Coordinate Reference System Projections drop-down list displays only the projections that the layers have in common.
4. To change the projection for a WMS layer, go to Table > WMS Table Properties and choose a new projection from the Coordinate Reference System drop-down list.
Projection Issues with WMS Map Data
The coordinate system used in the WMS map image is very important.
It is what enables the WMS layer to match up with your other layers.
Users should make sure they retrieve WMS Server images that they can use with the other maps in use.
Keep in mind that the raster layer always determines the projection of the map.
If there is more than one raster layer in a map, the largest raster layer determines the projection of the map.
When choosing the projection for a WMS map that is made up of several layers, the projection choices available will be only those that are common to all the layers.
WMS servers may offer data in projections that are not supported so be sure to choose a supported projection.